ASP.NET MVC 3层合作-数据验证
时间:2024/4/22作者:未知来源:盾怪网教程人气:
- [摘要]首先我们在M层创建一个类:using System; using System.Collections.Generic; using System.ComponentModel.DataAnnota...首先我们在M层创建一个类:
using System;
using System.Collections.Generic;
using System.ComponentModel.DataAnnotations;
using System.Linq;
using System.Web;
namespace WebApplication1.Models
{
    public class GuestResponse
    {
        //数据验证,必填项,如果不填ErrorMessage 请输入你的用户名
        [Required(ErrorMessage = "请输入你的用户名!")]
        public string Name { get; set; }
        //同上
        [Required(ErrorMessage = "请输入邮箱")]
        //正则表达式,判断是否是邮箱格式
        [RegularExpression(".+\\@.+\\..+",
        ErrorMessage = "请输入正确的邮箱格式")]
        public string Email { get; set; }
        //同上
        [Required(ErrorMessage = "请输入你的手机号码")]
        public string Phone { get; set; }
        public bool? WillAttend { get; set; }
    }
}
代码中已有注释,不多说。
下面,V层:
@model WebApplication1.Models.GuestResponse
@{
    Layout = null;
}
<!DOCTYPE html>
<html>
<head>
    <meta name="viewport" content="width=device-width" />
    <title>RsvpForm</title>
</head>
<body>
    @using (Html.BeginForm())
    {
        @Html.ValidationSummary()
        <p>Your name: @Html.TextBoxFor(x => x.Name) </p>
        <p>Your email: @Html.TextBoxFor(x => x.Email)</p>
        <p>Your phone: @Html.TextBoxFor(x => x.Phone)</p>
        <p>
            Will you attend?
            @Html.DropDownListFor(x => x.WillAttend, new[] {
            new SelectListItem() {Text = "Yes, I'll be there",
            Value = bool.TrueString},
            new SelectListItem() {Text = "No, I can't come",
            Value = bool.FalseString}
            }, "Choose an option")
        </p>
        <input type="submit" value="Submit RSVP" />
    }
</body>
</html>
这里注意第一行,
@model WebApplication1.Models.GuestResponse
我们绑定我们写的数据类,这样我们才能顺利创建表单。
然后是C层:
 [HttpGet]
        public ViewResult RsvpForm() {
            return View();
        }
        [HttpPost]
        public ViewResult RsvpForm(GuestResponse model)
        {
            if (ModelState.IsValid)
            {
                // TODO: Email response to the party organizer
                return View("Thanks", model);
            }
            else
            {
                // there is a validation error
                return View();
            }
        }
这里我们有两个RsvpForm,我们在上面添加提交方式,分别是Get和Post
if (ModelState.IsValid)
是否通过数据验证,通过返回视图Thanks,且把表单传过来的值传给Thanks视图
数据验证不通过,返回原视图,
这里注意V层
@Html.ValidationSummary()
添加这句话,在数据验证的时候,数据不通过,视图层才能显示我们的错误提示信息。
运行截图演示:
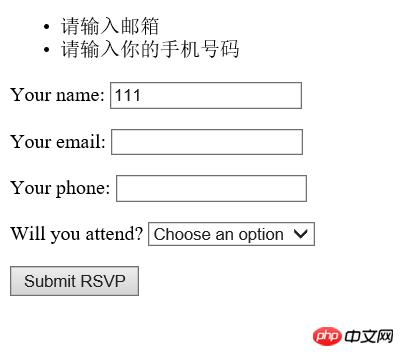
我们只输入了姓名,其他没有输入,提示错误信息
我们输入一个正确的:
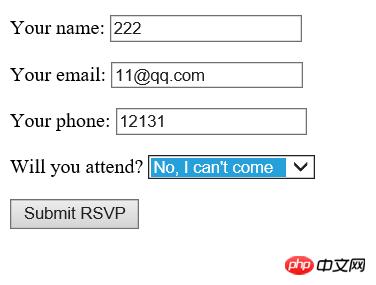
然后点击,调到Thanks视图,Thanks视图代码如下:
@model WebApplication1.Models.GuestResponse

@{
    Layout = null;
}

<!DOCTYPE html>

<html>
<head>
    <meta name="viewport" content="width=device-width" />
    <title>Thanks</title>
</head>
<body>
    <p>
        <h1>Thank you, @Model.Name!</h1>
        @if (Model.WillAttend == true)
        {
            @:It's great that you're coming. The drinks are already in the fridge!
}
        else
        {
            @:Sorry to hear that you can't make it, but thanks for letting us know.
}
    </p>
</body>
</html>
这里注意,我们也要绑定我们写的模型类:
@Model.Name
我们输入的姓名
Model.WillAttend == true
我们输入的值,像传其他,跟这样类似。
结果截图:
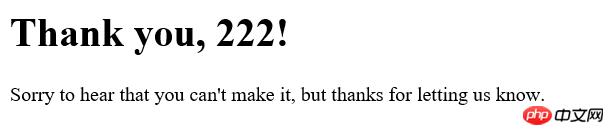
至此,我们的MVC三层合作,数据验证,完成!
本文讲解了ASP.NET MVC 三层合作-数据验证,更多相关内容请关注php中文网。
相关推荐:
简易 PHP+MySQL 分页类
两个不用递归的树形数组构造函数
HTML转Excel,并实现打印,下载功能
以上就是ASP.NET MVC 三层合作-数据验证的详细内容,更多请关注php中文网其它相关文章!
网站建设是一个广义的术语,涵盖了许多不同的技能和学科中所使用的生产和维护的网站。
关键词:ASP.NET MVC 3层合作-数据验证