xcode5真机调试图文详细教程 xcode5真机测试步骤
时间:2024/12/29作者:未知来源:盾怪网教程人气:
- [摘要]第一步、制作证书1)打开 Finder->应用程序->实用工具 -> 钥匙串访问 ; 2)单击“钥匙串访问”选择“证书&...
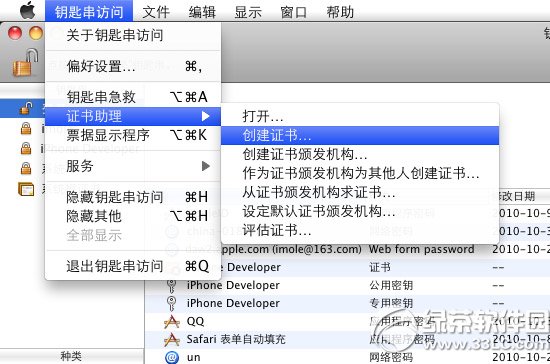
第一步、制作证书
1)打开 Finder->应用程序->实用工具 -> 钥匙串访问 ;
2)单击“钥匙串访问”选择“证书”再选择“创建证书”,证书名称必须填写为 iPhone Developer。
第二步、修改XCode配置文件
注:如遇到文件无法解锁没有权限不能修改,可以复制一份出来,修改好之后将原来的替换掉
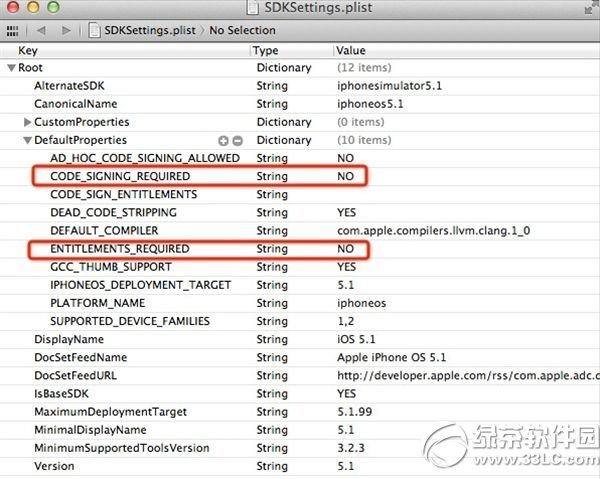
1)修改SDKsettings.plist文件/Applications/Xcode.app/Contents/Developer/Platforms/iPhoneOS.platform/Developer/SDKs/iPhoneOS5.1.sdk
打开该目录下的SDKSettings.plist文件,把CODE_SIGNING_REQUIRED和ENTITLEMENTS_REQUIRED的值改成NO
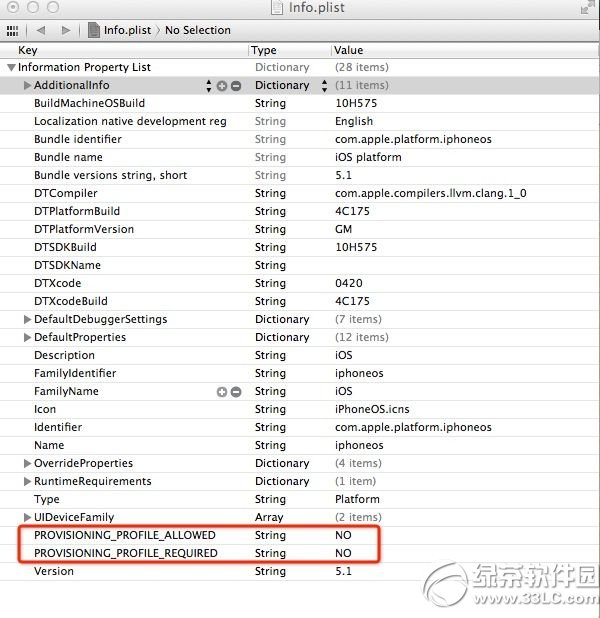
2)修改Info.plist文件
/Applications/Xcode.app/Contents/Developer/Platforms/iPhoneOS.platform/
用XCode打开该目录下的Info.plist文件,右击--Add Row,增加两项:
PROVISIONING_PROFILE_ALLOWED 值为 NO
PROVISIONING_PROFILE_REQUIRED 值为 NO
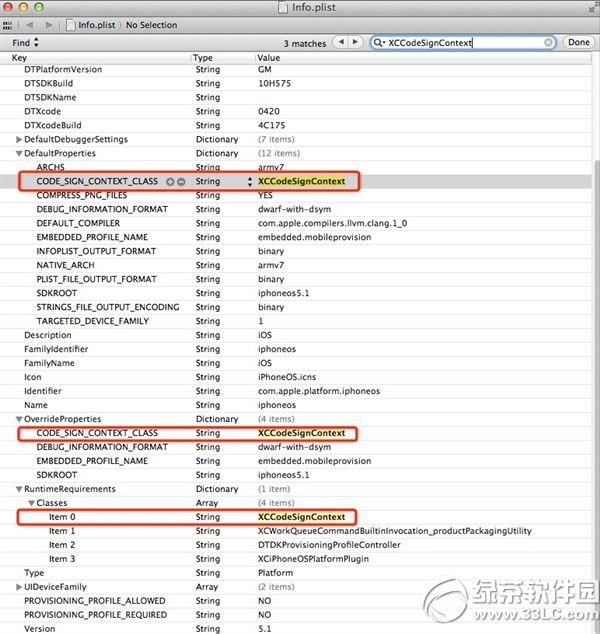
3)将上面Info.plist文件中的 "XCiPhoneOSCodeSignContext" 替换成"XCCodeSignContext"(共3处)
第三步、设置gen_entitlements.py脚本权限
注:如果你的电脑联网了,那么执行1)的命令后会在相应的目录自动创建iphoneentitlements文件夹及其下的gen_entitlements.py文件,如执行后没有生成指定文件,请重复执行下面的命令或者换第二种方法,两种生成脚本文件的方法任选一种。
1)在终端执行如下命令:
mkdir /Applications/Xcode.app/Contents/Developer/iphoneentitlements
cd /Applications/Xcode.app/Contents/Developer/iphoneentitlements
curl -O http://www.alexwhittemore.com/iphone/gen_entitlements.txt
mv gen_entitlements.txt gen_entitlements.py
sudo chmod 777 gen_entitlements.py
2)上面的命令执行成功之后,会在/Applications/Xcode.app/Contents/Developer/目录下生成一个iphoneentitlements文件夹和其下的gen_entitlements.py文 件,如果你的电脑没有联网或者不能自动生成相关目录文件,那么需要手动在相应的目录创建指定的文件,随后需要给gen_entitlements.py设 置权限。
gen_entitlements.py脚本文件的内容如下:
#!/usr/bin/envpython
import sys
import struct
if len(sys.argv)!= 3:
print "Usage: %s appnamedest_file.xcent" % sys.argv[0]
sys.exit(-1)
APPNAME =sys.argv[1]
DEST =sys.argv[2]
if notDEST.endswith('.xml') and not DEST.endswith('.xcent'):
print "Dest must be .xml (for ldid) or.xcent (for codesign)"
sys.exit(-1)
entitlements ="""
application-identifier
%s
get-task-allow
"""% APPNAME
f = open(DEST,'w')
ifDEST.endswith('.xcent'):
f.write("\xfa\xde\x71\x71")
f.write(struct.pack('>L',len(entitlements) + 8))
f.write(entitlements)
f.close()
在终端给gen_entitlements.py设置权限(可能会要你输入密码)
sudo chmod 777 /Applications/Xcode.app/Contents/Developer/iphoneentitlements/gen_entitlements.py
xcode5真机调试教程第四步、修改项目属性 (每次新建项目都要执行)
1)点击项目图标,找到"BuildSettings"选项下的"Code Sign Identity",将其值全部改为"Don't Code Sign"
2)切换到Build Phases选项,点击右下角的Add Build Phase,然后单击Add Run Script,然后在Run Script中输入以下脚本:
export
CODESIGN_ALLOCATE=/Applications/Xcode.app/Contents/Developer/Platforms/iPhoneOS.platform/
Developer/usr/bin/codesign_allocate
if [ "${PLATFORM_NAME}" =="iphoneos" ]
关键词:xcode5真机调试图文详细教程 xcode5真机测试步骤